
We’ve all encountered this scenario. After investing hours in writing comprehensive functional tests, everything appears perfect—the “Login” button functions as expected, database updates are validated, and users are correctly redirected. All tests pass successfully. However, upon opening the application in a browser, you notice the “Login” button overlapping the footer or the CSS layout completely broken. While functional tests confirm that the application logic works, they do not guarantee that the user interface appears as intended.
This guide aims to close that gap. By combining the execution speed of Playwright with the visual accuracy of Percy (by BrowserStack), You can ensure application not only functions correctly but also delivers a polished visual experience.
Let’s dive into the setup using Python.
Setup using Python
Step 1: Setting the Stage – Creating a Virtual Environment
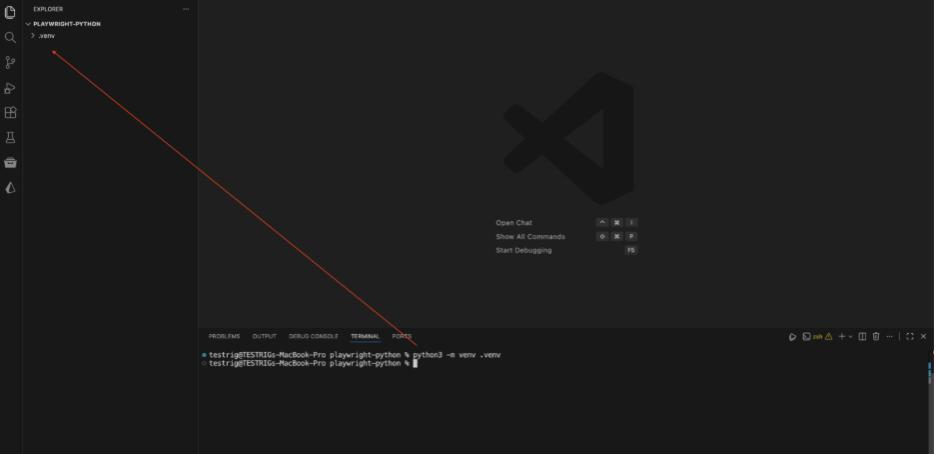
Before installing any tools, it’s essential to prepare a clean and controlled workspace. Python dependency management can quickly become complex, especially when multiple projects share the same system environment. To avoid conflicts and ensure a stable Playwright setup, we begin by creating a virtual environment (venv).
python -m venv .venv
This command creates a dedicated virtual environment in a hidden directory named .venv within your project folder
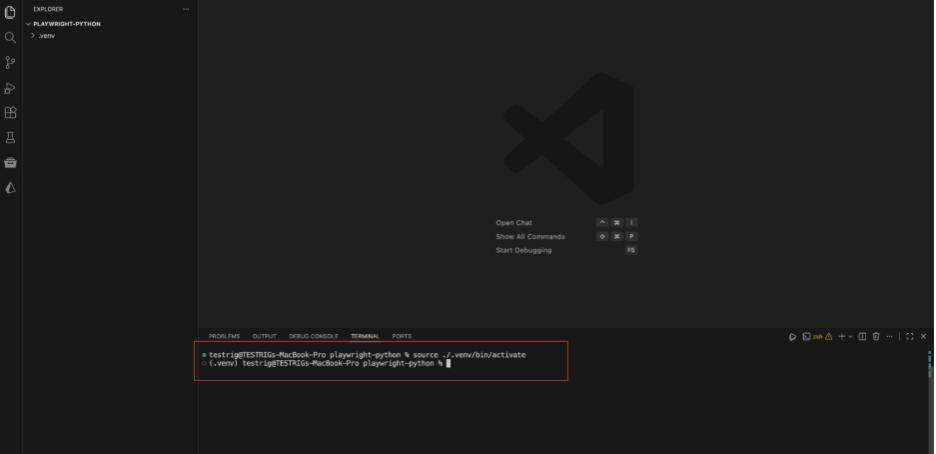
Now, activate the virtual environment so the terminal recognizes the isolated workspace when installing and running packages.
For Mac/Linux:
source ./.venv/bin/activate
For Windows:
.\.venv\Scripts\activate
With the virtual environment activated, the next step is to install the core engine responsible for browser automation: Playwright. Since Python is being used, the pytest-playwright plugin is installed to enable seamless integration with the pytest framework.
Install Package
Run the following command to install the required package:
pip install pytest-playwright
After installing the Python package, the next step is to download the actual browser binaries—Chromium, Firefox, and WebKit—that Playwright interacts with during test execution.
playwright install
This completes the Playwright setup and prepares the environment for cross-browser automation testing.
Step 3: The First Test Drive
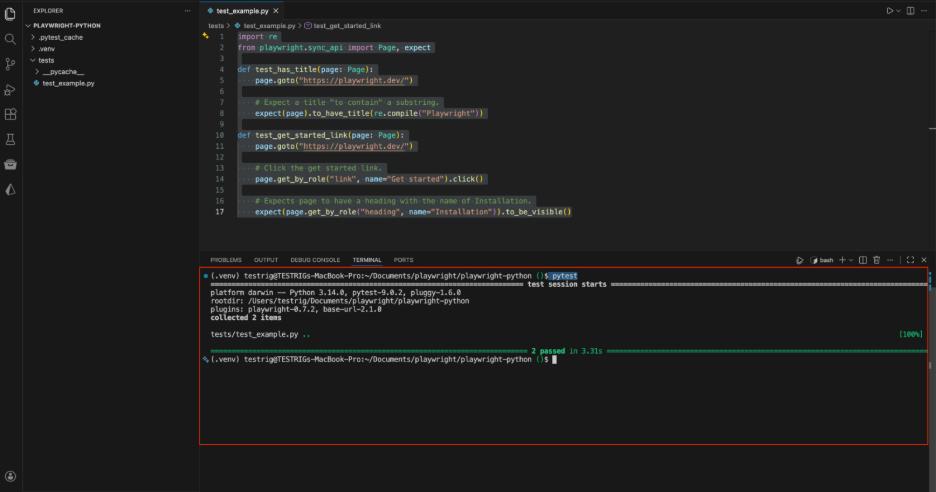
To validate that the setup is working correctly, begin by creating a standard functional test. Create a folder named tests, and within it, add a file named test_example.py.
Note: Pytest automatically discovers test files that either start with test_ or end with _test.
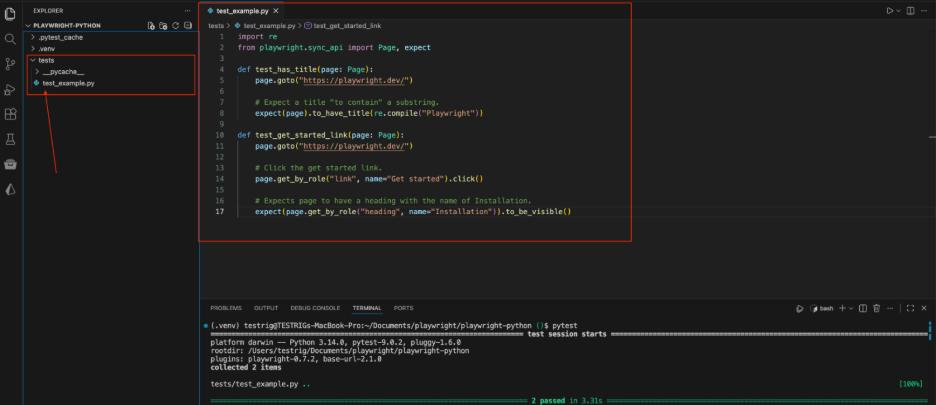
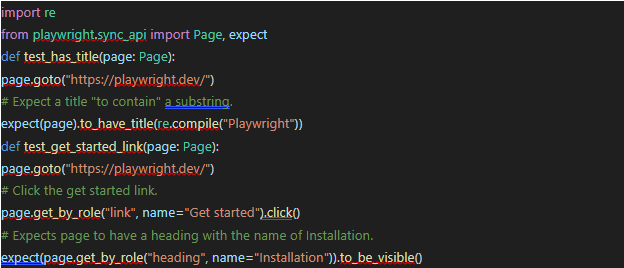
Add the following code to test_example.py. This script visits the Playwright homepage and verifies the title and a link:
Execute the test using the following command:
pytest
If everything runs successfully, the automation engine is performing perfectly. Now, it’s time to give it eyes.
 Percy with BrowserStack
Step 4: Adding Visual Insight – Percy Setup
To enable visual testing, a reliable system is required to capture, store, and compare UI screenshots. For this purpose, Percy by BrowserStack is used to provide automated visual validation across test runs.
Follow these steps to set up Percy:
1. Create a free account on BrowserStack / Percy.
2. Create a new Percy project and select “Web” as the project type.
3. Copy the generated PERCY_TOKEN, which will be used to authenticate test executions with Percy.
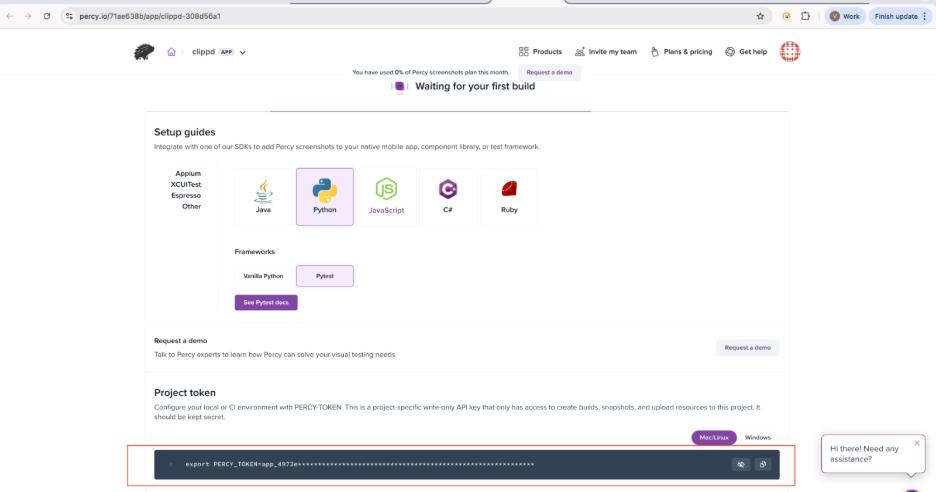
Storing the Token Securely
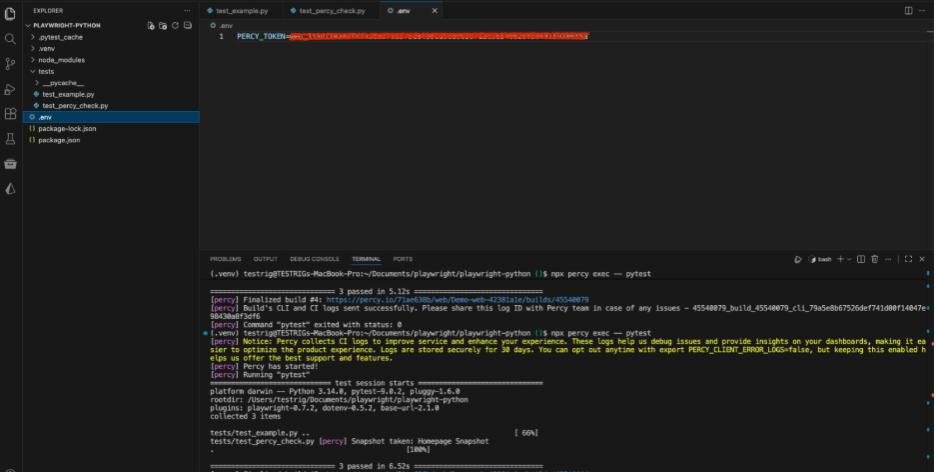
Sensitive credentials should never be hardcoded into source code. To securely manage the Percy authentication token, a .env file is used.
First, install the required package to enable environment variable support in pytest:
pip install pytest-dotenv
Next, create a file named .env in the root directory of the project and add the Percy token as shown below:
PERCY_TOKEN=aa11bb22cc33_your_token_here
Step 5: Integrating the Percy SDK
To connect Python-based Playwright tests with the Percy cloud platform, two components are required: the Percy Python SDK and the Percy CLI. The CLI runs on Node.js and is responsible for orchestrating visual snapshot uploads during test execution.
First, install the Python SDK :
pip install percy-playwright
Next, install the Percy CLI as a development dependency:
npm install –save-dev @percy/cli
With both components installed, the test framework is now capable of capturing visual snapshots and transmitting them to Percy for automated visual comparison.
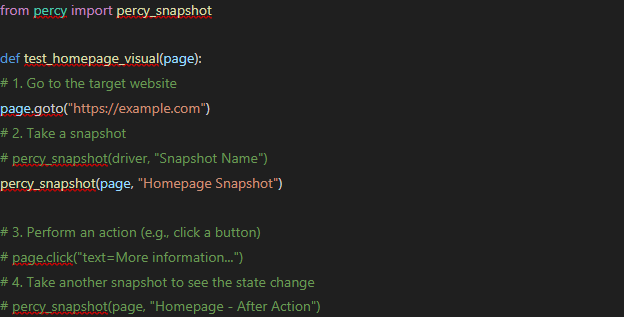
Step 6: Capturing the Moment
This is where visual testing is introduced. The existing test is modified to capture a visual snapshot. Unlike a standard screenshot that only saves an image, percy_snapshot captures the DOM and CSS, sends them to the Percy cloud, and renders the application across different browsers and responsive widths.
Create a new file named test_visual.py (or update the existing test file) to add visual snapshot support.
This step ensures that visual changes are detected alongside functional test validations.
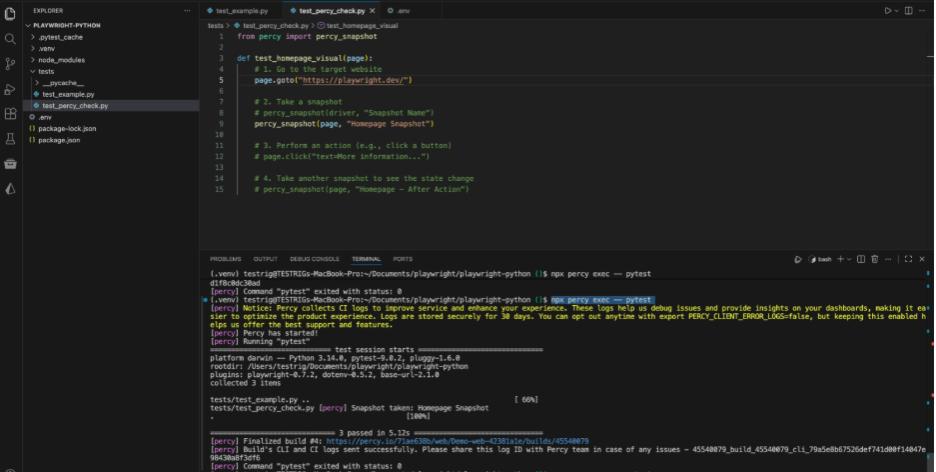
Step 7: The Grand Finale – Test Execution
This is the critical step. Running the tests requires more than just pytest; the command must be wrapped with percy exec.
The percy exec wrapper starts a background agent that listens for snapshot requests from the Python tests and uploads them to the Percy cloud for visual analysis.
Execute the tests using the following command:
npx percy exec — pytest
After running the command, the terminal will provide a URL to the build on BrowserStack. Click the link to view the results.
Step 8: Understanding the Results
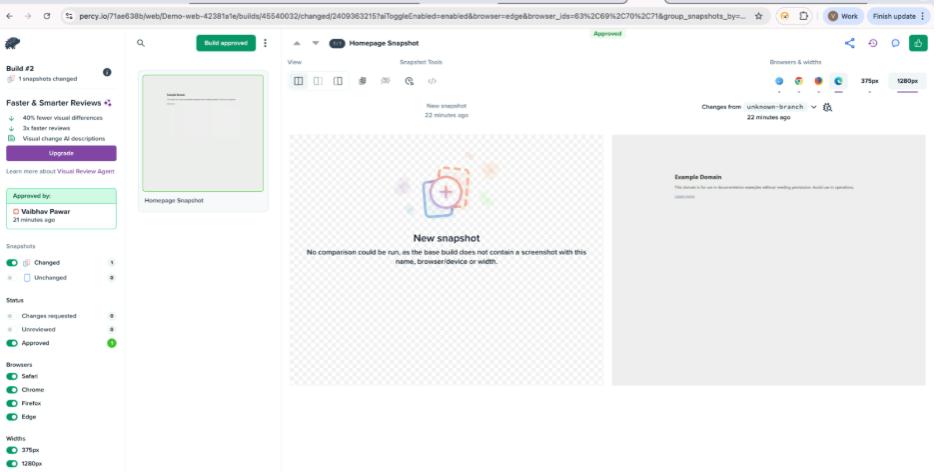
Scenario A: The Baseline
On the first test run, Percy has no previous snapshots for comparison. This initial run is therefore treated as the Baseline.
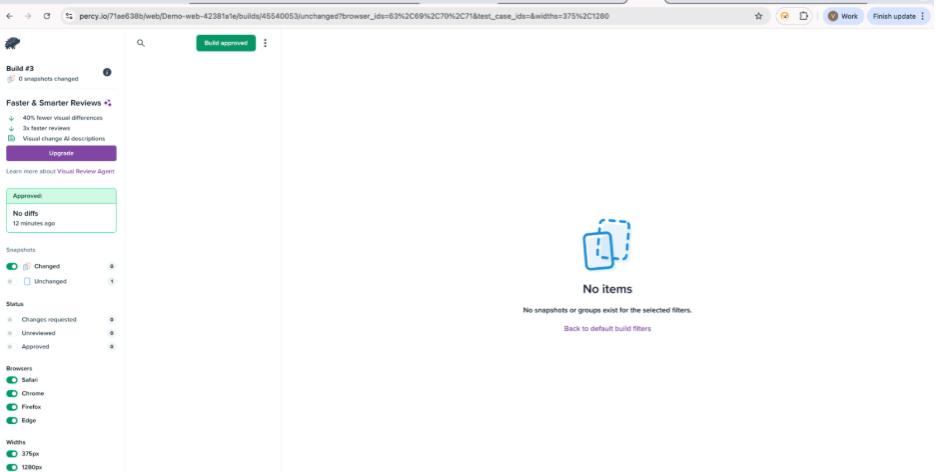
Scenario B: No Changes
If you run the test again without changing the website code, Percy will compare the new snapshots to the baseline. If not a single pixel has changed, it will report “0 changes.”
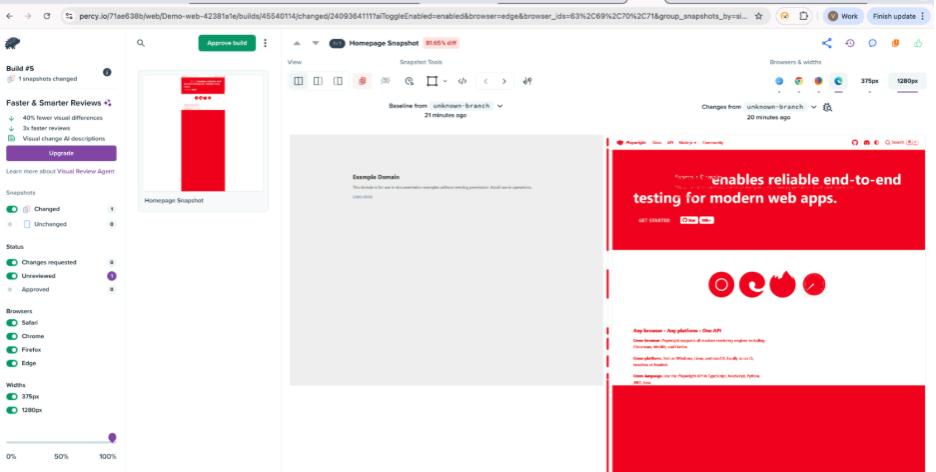
Scenario C: Visual Regression
If the CSS is accidentally broken or a font is changed, Percy will detect the difference. The dashboard displays a side-by-side comparison, highlighting changes in red, enabling UI issues to be identified and addressed before they reach end users.
Conclusion
By integrating Playwright’s reliable automation with Percy’s visual testing capabilities, testing goes beyond simply verifying that a feature works. It now ensures that the application appears exactly as intended by the design team.
Visual regression testing serves as a safeguard, catching subtle UI issues that functional tests might overlook, and providing confidence in both functionality and appearance.
At Testrig Technologies, this approach is implemented through:
- Playwright test automation to validate functionality.
- Percy visual testing to catch UI regressions early.
- Cross-browser and responsive checks for consistent user experience.
- Proactive QA strategies to reduce risks and accelerate releases.
By leveraging these practices, Testrig Technologies empowers teams to deliver applications that are not only fully functional but also visually flawless, enhancing both user satisfaction and business confidence.