
Selenium is a popular testing framework used by developers and QA professionals to automate web browser interactions. One of the most useful features of Selenium is its ability to use XPath to locate elements on a web page. In this article, we’ll discuss what XPath is, the different types of XPath available in Selenium, and how to use XPath in your Selenium tests.
What is XPath in Selenium?
XPath is a powerful and flexible language used to locate elements on a web page. In Selenium, XPath is commonly used to identify specific elements that need to be interacted with during automated testing. Here are some key points about XPath in Selenium:
– XPath is a query language used to navigate through the elements of an XML document or HTML page.
– XPath expressions can be used to select elements based on their tag name, attributes, or their position in the document.
– XPath expressions can be constructed using various functions and operators, making it a very flexible tool.
– Selenium supports both absolute and relative XPath expressions. Absolute XPath expressions start from the root of the document, while relative XPath expressions start from the current node.
– XPath can be used with various Selenium methods, such as find_element_by_xpath() and find_elements_by_xpath(), to locate elements on a web page.
– While XPath can be a powerful tool for locating elements, it can also be complex and brittle. It’s important to use XPath judiciously and with an eye towards maintainability and readability.
Types of XPath in Selenium
There are two types of XPath available in Selenium: Absolute XPath and Relative XPath. Let’s take a look at it;
1. Absolute XPath
Absolute XPath starts with a single forward slash (/) and provides the complete path from the root node to the element. It uses the tagname, attribute, and attribute value to locate the element. In the above example, the XPath is used to locate a link (a tag) which is the third list item (li tag) under the second div (div[2]) under the first div (div[1]) in the HTML document.
Format:
/html/body/div[1]/div[2]/ul/li[3]/a
Syntax: /tagname[@attribute=’value’]/tagname[@attribute=’value’]/tagname[@attribute=’value’] Example: /html/body/div[1]/div[2]/ul/li[3]/a
2. Relative XPath:
Relative XPath starts with a double forward slash (//) and provides the path from the current node or context node to the element. It also uses the tagname, attribute, and attribute value to locate the element. In the above example, the XPath is used to locate a link (a tag) which is the third list item (li tag) under the unordered list (ul tag) inside a div (div tag) with a class attribute value of “example”.
Format:
//div[@class=’example’]/ul/li[3]/a
Syntax: //tagname[@attribute=’value’]/tagname[@attribute=’value’]/tagname[@attribute=’value’] Example: //div[@class=’example’]/ul/li[3]/a
Read also: Top Locators In Selenium and How To Use Them
How to Use XPath in Selenium?
Using XPath in Selenium is a straightforward process. Here are the basic steps to follow:
1. Open a web browser using Selenium WebDriver.
2. Navigate to the web page you want to automate.
3. Inspect the HTML code of the web page to identify the element you want to locate using XPath.
4. Write an XPath expression to locate the element using its attributes, text, or position in the DOM structure.
5. Use driver.find_element_by_xpath() method to find the element using the XPath expression.
6. Interact with the element as needed, such as clicking, typing, or getting its text or attribute values.
7. Repeat steps 4-6 for other elements you want to automate.
8. Close the web browser using driver.quit() method.
Here’s an example that shows how to use XPath to locate an element in Selenium:
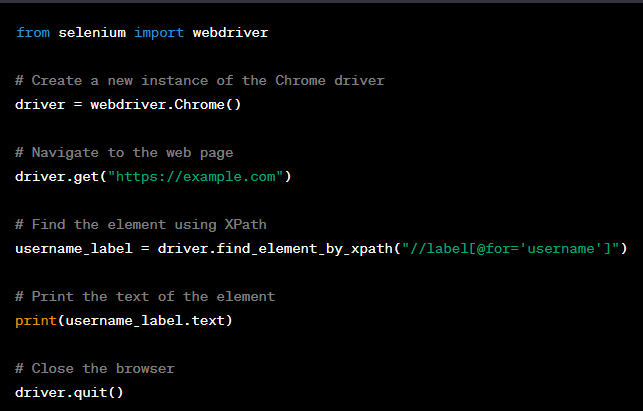
In the above code, we first import the webdriver module and create a new instance of the Chrome driver. Then, we navigate to the web page and use driver.find_element_by_xpath() method to locate a button element inside a div element with a class attribute value of “example”. Finally, we interact with the element by clicking on it and close the browser.
It’s important to note that XPath expressions can vary based on the structure of the HTML code, and it’s recommended to use unique and specific attributes for locating elements to ensure stability and maintainability of the test scripts.
How to use XPath Axes With Example?
To use XPath axes in Selenium, you can use the find_element_by_xpath() or find_elements_by_xpath() method along with the appropriate XPath expression that includes the axes.
Here are some examples of how to use XPath axes in Selenium:
1. Ancestor : This axis selects all the ancestors of the current element. It includes the parent, grandparent, great-grandparent, and so on. The syntax for this axis is “ancestor::”.
Example: To select all the ancestors of an element with a particular class, you can use the following XPath expression:

2. Ancestor-or-self : This axis selects the current element and all its ancestors. The syntax for this axis is “ancestor-or-self::”.
Example: To select the current element and all its ancestors with a particular class, you can use the following XPath expression:

3. Attribute : This axis selects the attributes of the current element. The syntax for this axis is “@attribute-name”.
Example: To select the value of a specific attribute of an element with a particular class, you can use the following XPath expression:

4. Child : This axis selects all the children of the current element. The syntax for this axis is “child::”.
Example: To select all the child elements of a specific parent element, you can use the following XPath expression:

5. Descendant : This axis selects all the descendants of the current element. It includes the children, grandchildren, great-grandchildren, and so on. The syntax for this axis is “descendant::”.
Example: To select all the descendant elements of an element with a particular class, you can use the following XPath expression:

6. Descendant-or-self : This axis selects the current element and all its descendants. The syntax for this axis is “descendant-or-self::”.
Example: To select the current element and all its descendants with a particular class, you can use the following XPath expression:

7. Following : This axis selects all the elements that come after the current element in the document tree. The syntax for this axis is “following::”.
Example: To select all the elements that come after an element with a particular class, you can use the following XPath expression:

8. Following-sibling : This axis selects all the siblings that come after the current element in the document tree. The syntax for this axis is “following-sibling::”.
Example: To select all the sibling elements that come after an element with a particular class, you can use the following XPath expression:

9. Namespace : This axis selects all the elements in a particular namespace. The syntax for this axis is “namespace::”.
Example: To select all the elements in a specific namespace, you can use the following XPath expression:

10. Parent : This axis selects the parent of the current element. The syntax for this axis is “parent::”.
Example: To select the parent element of an element with a particular class, you can use the following XPath expression:

11. Preceding : This axis selects all the elements that come before the current element in the document tree. The syntax for this axis is “preceding::”.
Example: To select all the elements that come before an element with a particular class, you can use the following XPath expression:

12. Preceding-sibling : This axis selects all the siblings that come before the current element in the document tree. The syntax for this axis is “preceding-sibling::”.
Example: To select all the sibling elements that come before an element with a particular class, you can use the following XPath expression:

13. Self : This axis selects the current element. The syntax for this axis is “self::”.
Example: To select the current element with a particular class, you can use the following XPath expression:

XPath axes can be used in combination with other XPath expressions to select specific elements on a web page. By using these axes, you can navigate the document tree and select elements based on their relationship to other elements in the tree.
Conclusion
XPath is a valuable feature for automating web testing with Selenium, and it can greatly enhance the efficiency and effectiveness of test automation efforts.
Looking to hire Selenium Testing Company? At Testrig Technologies we specializes in providing comprehensive end-to-end web application automation testing services. Our skilled team of experts is dedicated to ensuring the highest levels of quality and reliability in every project. Contact us today!