
Automated tests are meant to speed up development—not slow it down. But even small UI changes like a modified element ID or a shifted button can cause automated scripts to fail. These aren’t bugs in the app—they’re minor tweaks that break rigid test locators.
The result? Test cases fail, pipelines go red, and QA teams waste hours debugging something that worked just fine yesterday.
Self-healing test automation fixes this problem. It makes your test scripts smart enough to detect and recover from unexpected UI changes—automatically. Let’s start with what it really means—and how it handles changes that break traditional test scripts.
Read More: How to Implement 8 Self-Healing Test Automation Best Practices ?
What is Self-Healing Test Automation?
Self-healing test automation is a smart enhancement to traditional test scripts. It allows your automated tests to identify, adapt to, and recover from unexpected UI changes—without manual intervention.
In standard automation frameworks like Selenium or Cypress, tests rely on fixed locators (e.g., XPath, CSS selectors, IDs) to interact with web elements. When any of these locators change—even slightly—the test fails.
Consider Scenario like below
Let’s say you have a test case that clicks the “Login” button using the following locator:
await page.click(‘#login-button’);
After a front-end update, the developer changes the element’s ID from login-button to btn-login. The button looks the same and works the same, but your test now throws a “NoSuchElementException” or fails silently depending on the framework.
In traditional automation, you now have to:
- Pause your CI/CD build,
- Investigate the failure,
- Update the locator manually, and
- Rerun the test.
Now, here’s what happens with self-healing automation:
- The test execution detects that #login-button no longer exists.
- It searches for a similar element based on other stored properties—such as button text, tag type, class name, or position in the DOM.
- If it finds a confident match (like #btn-login), it auto-updates the locator on the fly and continues the test.
- A healing report is generated post-run so the team can review or approve the change.
This intelligent fallback mechanism keeps your test stable and running, even as the UI evolves.
Self-healing doesn’t eliminate locator strategy—it strengthens it by making it more resilient.
Best Practice to Consider: Retry and Wait Strategies in Self-Healing Automation
Before initiating the self-healing process, it’s important to implement smart retry and wait strategies to handle transient UI issues effectively. These include automatic retries, “wait until visible” conditions, and controlled page refreshes. Such strategies help address timing-related failures—such as slow-loading elements or brief network delays—before invoking the self-healing mechanism. This reduces unnecessary healing attempts and significantly improves overall test reliability and stability.
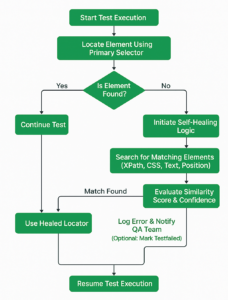
How Does Self-Healing Test Automation Work?
Self-healing automation works by combining backup element intelligence, real-time error detection, and smart locator substitution—all during test execution. It’s not magic; it’s a structured mechanism that uses historical data and logic to adapt when a locator fails.
Here’s a step-by-step breakdown of how it functions:
Step 1: Element Metadata Collection
When a test is executed for the first time, the framework captures and stores multiple attributes of each UI element:
- ID, XPath, and CSS selectors
- Tag name (<button>, <input>, etc.)
- Visible text (e.g., “Login”, “Submit”)
- Class names and ARIA labels
- Element position in the DOM
This forms a locator profile or element signature, which acts as a fallback reference.
Step 2: Runtime Failure Detection
During test execution, if an element isn’t found using the original locator (for example, #login-button), the framework flags it as a potentially broken locator.
Instead of failing the test immediately, it triggers a healing routine to recover the interaction.
Step 3: Smart Element Matching
The framework now searches the current DOM for other elements that match the previously stored metadata. This step may involve:
- Fuzzy matching (e.g., partial text match or similar attribute patterns)
- DOM structure comparison (finding similar elements in the same DOM path)
- Visual proximity or tree similarity (for tools with visual analysis capabilities)
If an element is found with high enough confidence, it is selected as a valid replacement.
Step 4: Healing and Continuation
Once a new match is identified:
- The test continues using the new locator without breaking it.
- The test run is marked as “healed,” and the new locator is logged.
- Depending on the framework, the script may be automatically updated, or the tester may receive a prompt to approve changes manually.
Self-Healing Test Automation Tools and Frameworks
| Tool/Framework | Key Capabilities | Self-Healing Approach |
| Healenium | Selenium integration | Replaces broken locators at runtime using stored metadata |
| Testim | AI-based test authoring | Uses machine learning to track stable element traits |
| Katalon Studio | Record-and-playback & scripting | Smart XPath fallback and multiple locator strategy |
| Mabl | Intelligent cloud testing | Auto-locates elements using visual and structural analysis |
| Functionize | AI-driven test cloud | Adapts using NLP and ML with minimal scripting |
| ACCELQ | No-code automation | Self-healing using object recognition and test intent logic |
Key Benefits of Self-Healing Automation Testing You Should Know
- Less Time Spent on Maintenance
Self-healing scripts automatically adjust to UI changes by updating locators like XPath or CSS, reducing the constant need for manual fixes. - More Stable Test Execution
By adapting to minor DOM changes, it helps eliminate flaky tests and ensures more consistent results in CI/CD pipelines. - Faster Feedback for Teams
With fewer test failures and less debugging, teams get quicker insights into build quality, helping speed up release cycles. - Smarter Element Identification
Instead of relying on a single locator, self-healing uses multiple attributes and AI/ML logic to accurately identify elements—even in dynamic UIs. - Easier Scaling of Automation
As test suites grow, self-healing reduces brittleness, making it easier to scale automation without increasing maintenance effort.
How to Implement Self-Healing Test Automation in Your Framework
Adding self-healing capabilities depends on your current tech stack. Here’s a general implementation path that works across most setups:
1. Integrate a Self-Healing Layer
If you’re using Selenium or WebDriver-based tools:
- Integrate a library like Healenium into your test project.
- Wrap your element locators with a custom handler that monitors failures and applies fallback strategies.
// Healenium in Java (example)
import com.epam.healenium.SelfHealingDriver;
import org.openqa.selenium.WebDriver;
import org.openqa.selenium.chrome.ChromeDriver;
WebDriver originalDriver = new ChromeDriver();
SelfHealingDriver driver = SelfHealingDriver.create(originalDriver);
WebElement loginBtn = driver.findElement(By.id(“login-button”));
In other tools like Katalon or Testim, self-healing is already embedded and can be configured via the UI or project settings.
2. Enable Locator Backup
Store multiple attributes for each element during test execution:
- Primary selector (ID, XPath)
- Backup selector (CSS, Name, ARIA label)
- Contextual info (text content, tag type, DOM path)
Store these profiles in a structured format (JSON, local DB, or external service):
{
“elementKey”: “loginButton”,
“selectors”: {
“primary”: “#login-button”,
“backup”: [
“//button[text()=’Login’]”,
“[aria-label=’Sign In’]”,
“.btn.login”
]
},
“metadata”: {
“tag”: “button”,
“text”: “Login”,
“role”: “button”
}
}
3. Configure Healing Rules
Define rules such as:
- How many fallback attempts are allowed?
- What similarity score is acceptable?
- Should the script auto-update or ask for approval?
Example Healing Rule (Pseudocode):
if (primarySelectorFails) {
for (backup of storedBackups) {
if (confidenceScore(backup, currentDOM) > 0.8) {
use(backup);
markAsHealed();
break;
}
}
}
4. Monitor and Audit Healing Events
Implement reporting that flags:
- Which elements were healed?
- What changes were made?
- Whether healing succeeded or failed
Log Format Example:
{
“test”: “LoginTest”,
“element”: “#login-button”,
“healedTo”: “[aria-label=’Sign In’]”,
“confidence”: 0.89,
“status”: “healed”,
“timestamp”: “2025-06-17T11:20:00+05:30”
}
This allows your QA team to validate and optionally commit locator updates to your repository.
End Note:
Self-healing automation is a game-changer for teams tired of chasing broken locators and fragile scripts. It transforms your test suite into a smart, resilient layer that keeps pace with rapid UI changes—without slowing down your release cycle.
At Testrig Technologies, we combine innovation and precision to build robust, self-healing frameworks that evolve with your product. As a trusted automation testing company, we help engineering teams move faster, test smarter, and release with confidence.
Looking to make your test automation more intelligent and resilient?
FAQ
1. Why do traditional automated tests fail frequently?
Traditional tests rely on fixed locators such as XPath or CSS selectors. Even small UI changes—like renaming an element ID—can break tests, leading to frequent failures and maintenance effort.
2. Does self-healing completely eliminate test maintenance?
No, it significantly reduces maintenance by handling minor UI changes automatically, but manual updates are still required for major functional or logic changes in the application.
3. Which tools support self-healing test automation?
Popular tools and frameworks include Healenium, Testim, Katalon Studio, Mabl, and Functionize, all of which use AI/ML or smart locator strategies to enable self-healing capabilities